Pages

Sunday, May 21, 2017

Too Bright, Too Dark

The visible world around us is constantly changing. One second we may have the sun in our eyes, and another we're in a dark closet trying to find the light switch. Such fluctuations in brightness could have ended up being a serious problem for our vision if it weren't for a handy built-in feature: our eyes automatically adapt to the lighting conditions of the surrounding environment.

Most people are well aware that their pupils change size to handle lighting conditions. A larger pupil admits more light and makes the scene brighter, while a smaller pupil admits less light and makes the scene dimmer. This mechanism is fast and effective, and is controlled by the brain stem, which acts autonomously - you don't even have to think about it.

As useful as this type of adaptation may be, it has some limitations. For example, most artificial lighting is 20 times dimmer than the sun, while pupil dilation only brightens light by a factor of 4 (when compared with a fully constricted pupil). And then there are all those backlight situations - like when an unknown person is standing in front of a bright window, and you need to see whether it's a home intruder or a visiting friend. In short, pupil adjustment is insufficient. So what else do we have?

The answer: sensory adaptation. This term refers to the loss of sensitivity that comes after exposure to a stimulus, an ability that is actually shared by all of our senses. If you've ever looked for your glasses only to find them on your face, you've experienced the effects of sensory adaptation. It's useful because it eliminates old data so it doesn't obscure the new data (kind of like what Facebook does with old and new posts).

Our vision is also subject to sensory adaptation: try staring at the same point for 2 minutes, and everything will fade to the same shade of grey. This happens because the retina becomes desensitized to what it sees. Bright light causes the retina to become less sensitive, making the light appear dimmer. Dim light allows the retina to regain lost sensitivity, so the light seems brighter. In addition, different parts of the retina are affected independently, so while one object is darkened, an object right next to it could be brightened. Hence, the bright and dark areas of a scene are both made less extreme, so that the scene as a whole becomes easier to see.

There are two types of adaptation to light in vision, then. The first type affects the whole image, and is accomplished by pupil dilation/contraction. The second type can control different parts independently, and is accomplished by sensory adaptation.

***

What remains is to find a practical application. Obviously, photography is the place to go. A digital camera is very similar to an eye: both detect light, and both relay information to a central processor (whether a computer or a brain). One of the biggest differences between these two tools is the way they adapt to light.

Most cameras have an adjustable aperture. The aperture is the hole that light enters through. It usually contains a system of tiny fins which move to make the aperture larger or smaller, and are adjusted (often automatically) based on the brightness of the scene. This corresponds directly with the pupil in the human eye.

A camera can also adjust the exposure time, which is the amount of time that the shutter is open and light is permitted to enter into the camera. If the camera is digital, it can adjust the sensitivity of the sensor, which involves multiplying the data from the sensor by some numerical value. These mechanisms correspond partially with the second type of eye adaptation: they control the brightness (or, more properly, "exposure") of an image, but they cannot control parts separately. In other words, unlike the eye, a camera always adjusts the brightness of the whole photo equally.

This is actually a pretty big problem, because many photos end up looking completely different from reality. Next time you get the chance, try taking a photo of a person standing in front of a window. Visually, you will see both the person and the background, but the camera will either make the person a silhouette, or will wash out the background.

The solution is a technique called high-dynamic-range (HDR) imaging. In HDR imaging, multiple photos are taken with different exposures. Then, the best parts of each image are combined to form a single image that is more evenly exposed. Some people criticize HDR images for being artificial, but when done well, HDR images mimic human vision much better than normal photographs do.

As an illustration of this technique, I'll describe my process making an HDR image of a chapel at night. I started by taking these four images:


As you can see, the chapel is mostly washed out in the first image, but in the later images, the sky and the surrounding buildings look too dark. Using GIMP, I stacked the images, and used layer masks to make the images transparent based on brightness. The result was an image that showed detail on the chapel, without losing the surrounding buildings or the light on the clouds.


And that's it - a great image out of a number of okay photos. Kind of cool what you can do when you apply biology to technology, isn't it?


Wednesday, August 10, 2016

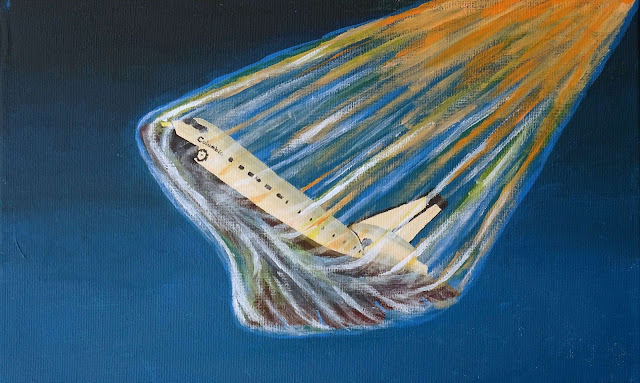
Reentry

Painting of space shuttle Columbia during reentry

A bright star streaks across the sky, leaving behind a glowing trail that soon fades back into the blackness of the night sky, leaving no perceptible trace. A minute later, another streak appears; this one has faint hues of pink and orange. Each streak lasts only a couple seconds, but its quiet beauty is not easily forgotten.

Maybe I could write a kid's book about it:
Fast star, slow star
Red star, blue star

The sight I'm describing is called a meteor (as I'm sure you already know). Meteors have been observed for as long as humans have existed, and have been a mystery for almost as long. It didn't take long to figure out  that they occurred high in the atmosphere - in fact, the name "meteor" was originally used for any atmospheric event - but it wasn't until the 19th century that somebody finally realized what they actually were: small bits of space debris burning up as they fell through the sky.

The question that naturally comes next: how does a meteor get so hot?

Saturday, July 2, 2016

Retractable Pen

The retractable pen is an interesting little device. You press a button, and the tip comes out. Press it again, and it does the opposite: the tip disappears back inside. How can the same action lead to different results?

In this post, I'm including a CGI animation I created using Blender. I actually modeled this pen in early 2012 (a little over 4 years ago); I recently fixed it up and re-rendered it.

A retractable pen has 5 main parts:
1. Frame
2. Thruster
3. Ink cartridge
4. Spring
5. Cam (a special mechanical piece; 1 or more is used)

The basic design is for the cam to rotate each time the pen clicker is pressed; the rotation allows for a pin (built into the frame) to slide into a different slot. Different slots have different lengths, and depending on the length of the slot, the ink cartridge will extend by a different amount.

There are many ways to work out the details, and the animation I created shows only one possibility. Of course, the design of the pen in the animation would not function well; the pin would snap off right away. I designed it this way to make it easier to see the mechanism; a stronger pin would obstruct the view.


New posts every month - subscribe for free!

Wednesday, June 1, 2016

Spring Skiing


Nothing beats a nice spring day on the slopes. The warm sun beams down, with its barely-filtered UV rays piercing through the thin air and frying all unprotected skin. The snow starts out icy, but before long it becomes soft and smooth, with slushy snow flying out at every turn. The weather can be really crazy - a couple years ago, Vail reopened for an extra weekend after closing when it was hit with a snowstorm that dumped 3 feet of snow.


Vail EpicMixOne of the best Spring skiing days I've ever experienced was nearly two months ago at Vail, a week before the closing date. Due to some lucky weather events, I experienced all three main types of snow conditions in a single day: ice, slush, and powder.


The day started out like any other: hard snow covered the trails, frozen solid from the cold night before. Turns were difficult to make on this surface, as the skis could not carve on the ice. Clouds covered the sky. It was cold, but not frigid.

Tuesday, May 24, 2016

Jelly Ball

One thing I enjoy when programming is to make weird interactive computer-generated objects. In this post, I'm showing you... a blob. To see the blob, simply click on the black box. The blob will immediately appear. Once you have the blob, you can drag it around with your mouse - just press down and move it around. When you let go, the blob will snap back with a little jiggle.


Click here!


There are a few things I'd like to point out about the blob:

First, when you stretch it, it actually gets narrower. When I designed this, I wanted it to shrink enough to look realistic, but not far enough that it looked weird.

Second, notice that it drags faster depending on how far you stretch it. The speed at which it drags is proportional to the square of the distance stretched. I found that this was much more realistic than making it directly proportional to the stretch. Also, if you only stretch it slightly, it doesn't drag at all (this simulates static friction).

Finally, there's gravity. The gravity isn't strong enough to drag the blob, but it is strong enough to stretch it slightly. When you first create the blob, it bounces slightly as a result of the gravity.


The graphics was probably one of the most interesting parts of writing this program. First I included my Firetools.js library for some simple graphics functions. Then I simply stacked a series of filled translucent circles. I placed the circles on a straight path from the base to the tip of the blob, and determined the size and color using some simple math.

One of the biggest challenges I faced in designing this blob was setting it up to move around the page. It took a long time to figure out how to disable the highlighting of text and the clicking of links below the blob. (For geeks who are interested in my solution, it involved disabling pointer events on the canvas, and using an event listener in the window to turn them back on whenever the mouse was over the blob.)

Overall, I'm really happy with my final result. I hope you enjoy it!


New posts every month - subscribe for free!